
Maggie Beer's Upside down Grape Cake

Greetings to all food lovers!

Masterchef 2012 season is on again, and I am not missing a single episode. There are so many wonderful recipes shown on the show, that I want to try cooking most of them myself. The list just keeps growing. To start with I tried making Maggie Beer's Upside down grape cake (challenge set up for one of the ellimination rounds). Although it had other two components namely Verjuice and Extra Virgin Olive Oil Ice Cream, with Vino Cotto Raisin and Ginger Wafer, I decided just to go with the Cake.
So check out the recipe on this link and give it a go
http://www.masterchef.com.au/recipes/upside-down-grape-cake-verjuice-and-extra-virgin-olive-oil-ice-cream-with-vino-cotto-raisin-and-ginger-wafer.htm

These are the photos I took at various stages, hopefully they will be helpful.
Step 1: Verjuice syrup in the cake pan

Step 2: Grapes lining the base over the syrup
 Oops I forgot to take the step 3 photos: Cake batter and meringue making ..... :(

Step 4: Mixture in the cake tin

Step 5: After baking
 And finally the finished product!! It was just delicious and yummy!
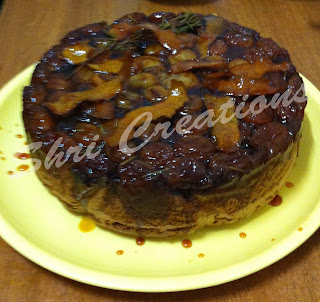
Step 6: Ta....da ...!!! turn it upside down!!!!

Happy Cooking everyone!!!


Comments

Popular posts from this blog

First Step

I started this blog when I had decided to take control of my life. It was April 2010. Long time has passed since then, but I had still not been able to do what I embarked upon. Someone reminded me that, I needed to move forward on the journey I had begun. But still I was afraid to step on the path, which will begin a new chapter in my life. I realised that I was scared of leaving my past and starting something completely new. Therefore I decided to choose some warm reminiscences and start on this journey. And the first thing that came to my mind was…Gardening, something I loved a lot, enjoyed and cherished. To reminisce a bit, I started helping my Baba in his gardens more than 15 years ago. I remember the Chrysanthemum collection he started back in 1995. Till then we had a very small garden with some flower and fruit trees. He suddenly took interest in this one plant and started collecting different varieties. Soon he had developed one of the most beautiful collections. Below are some

Watercolour + Photoshop

Hi Everyone, Like I said in last post, I will tell you about the new cards I made combining one of my watercolour painting and photoshop techniques. This was my original watercolour. Then I scanned it and treated in photoshop. First step was to change the brightness and contrast. Second changed colour range using colour balance tool. Then picking the background greens, applied a filter- angled brush strokes. This gave the following result. Now it is possible to print multiple copies of this card. All seasonal greeting cards are ready to print. Have a good week ahead! Cheers, Namrata

Watercolour painting

Good Morning Everyone, There is always a time when we look back on things we enjoyed doing.  Back in school and college days, I was very regular in doing drawing/ painting. Long gone are those days, when I would spend vacations taking different painting classes, learning new techniques and then making my own drawings. Come Diwali, and I would get busy making greeting cards with watercolour, poster colour and even pencil sketching at times. No two cards would be similar. I miss those golden days. Just recently I did some watercolour painting again. Revising my knowledge and skill was a hard job. But I managed as you can see the result is not so bad. Stage 1: Pencil Sketch Stage 2: Adding Grey and pink tones- one petal at a time Final Product  In my next post will show how I have turned this painting into digital greeting card. Till then have a good day ! Cheers, Namrata